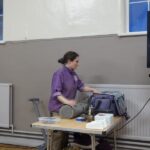
Before starting the demonstration, Les gave a brief outline of the past couple of years. Before COVID took a grip, Les had decided to retire. However, he soon missed doing demonstrations and the tuition side of life so decided to return to former activities. Tuition is delivered on a one-to-one basis two days a week.
Instead of running the shop in Bala, he joined an Artists Co-operative Gallery in Dolgellau. Each artist rents space to display their work – when items are sold, no commission is paid.
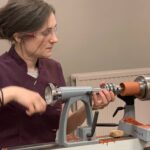
So on with the Demonstration – an egg tends not to have pointy ends and is nearer a sphere than anything else.  The first egg incorporated a hinge to join the almost semi
  spherical base to the slightly more elongated top. A piece of Cherry was turned down to the diameter of the hinge and a spigot was added to each end of the blank. The blank was then parted and to avoid losing too much timber, Les lined the tip of the parting tool with the centre of the blank and pushed if forward quickly. Too slow a movement causes a build-up of heat between the tool and wood and often results in burning. With the tool about three quarters of an inch into the blank, the tip of the tool was moved side to side to create a gap between the tool and the wood. This method minimises the cut at the surface but provides relief inside the blank.
To get the proportions of the egg as near as possible, involved some pre demo  measuring of various eggs. With the base held in a chuck, the outer edge was turned down to fit inside the hinge. The inside of the egg was then hollowed using a spindle
gouge after marking the desired diameter with a parting tool. To avoid vibration it is essential to have the cutting tip of the gouge on the centre line of the blank. Then in a fluid motion, insert the gouge into the blank, turn slightly anti-clockwise so that the lower wing of the gouge is cutting and sweep form the centre to the outer edge of the blank.
Mark the surface of the blank to reflect the width of the groove in the hinge. When the hinge fits snugly hollow out the middle more. Before finishing the inside, begin shaping the outside of the egg to make judging the thickness of the egg. When happy with the shape and thickness, sand the inside and coat in sanding sealer.
When using sanding sealer, wipe off as much excess as possible before burnishing with a clean piece of paper towel. The method generates heat which evaporate as much moisture as possible and avoids little white marks appearing on the surface
The half egg can then be held in suitable jaws to finish the outside of the egg. The timber is held in compression mode since any slight marking of the edge will be covered by the hinge. Les highlighted that the spindle gouge was being used as a scrapper with NO bevel rubbing. To achieve bevel rubbing the tool would be travelling form the outer rim towards the centre. The action results in cutting into the end grain in an unsupported manner, resulting in tear out. There is also a significant chance of the tip of the gouge running back to provide an unintentional spiral on the work. Making a shallow cut with the parting tool provide a shoulder to rest the bevel on. Preference should be to work from the centre out.
The outside of the egg was finished with the use of a jam chuck and tail centre support to complete the outside of the egg.

 The second half of the egg was then mounted in the jaws and the process repeated. Once happy with the fit of the hinge, epoxy resin glue is recommended to fit the parts together.
After the break, Les was sked what is the cheapest source of wood. The answer was to use green wood and the laburnum pot that Les showed to the meeting had been turned green, striving to keep the wall thickness on the sides and base as equal as possible. Once turned, place in a cool place in a box of dry shavings or in a black bag. If using the black plastic bag method , remove the piece and turn the bag inside out. Eventually the amount of water on the inside of the bag will reduce to nothing and the timber is dry. Remount the item to finish.
Using the box style of fitting, a second egg was made from a spalted timber. The major “issue” being that forming the mortice and tenon involves losing some of the outside of the timber and resulting in a loss of grain matching. To minimise the effect, after turning the first half of the egg, a plug was glued into the opening and turned away to form the tenon for that half of the egg. The other half of the egg was then turned to fit. The end result was a much reduced amount of loss in grain matching.
Successful shaping of the end of the egg, the bevel of the gouge should be perpendicular to the bed of the lathe. To get the smoothest curve with the spindle gouge, avoid trying to remove high spots and run the gouge around the complete curve using light cuts – highs will be removed.
 The third and final egg for the evening was turned from a solid piece of wood. With the blank between centre, it was turned to a cylinder with a skew. Mark the bottom to centre and centre to top of the egg, leaving some waste at both ends to avoid the small hole of the centre when finished. Use a parting tool to mark the top and bottom of the egg. Shape the bottom of the egg with the spindle gouge and go as far as you dare but avoiding the egg flying off the lathe.
 The base of the egg should be semi spherical and a waste block that has been hollowed to a suitable size can be held is a chuck and used to drive the egg ehne the small nib
has been sanded away. The tail centre is used to hold the egg in the drive cup. Shape the top of the egg as far as possible, leaving a small nb to be sanded away
Les completed eggs in three ways and was thanked by the chairmen and the Club members who expressed their appreciation in the usual manner.


Another excellent demonstration by les.
Good to see Les adding some practical advice to new and old ( experienced) turners.
Well worth inviting back in my opinion
Great report of the evening.